Implement Google reCAPTCHA v2 with Next.js and React.js - A Step-by-Step Guide


Introduction: Protecting Your Forms from Bots
Hii devs 👋 ! Have you ever seen a "I'm not a robot" checkbox on a website? 🤔 That's called reCAPTCHA. It helps stop spam bots from filling out your forms.
If you're building a website with Next.js and React.js, adding this security feature (Google reCAPTCHA) is very important. Without it, bots can spam your contact forms, sign-up pages, and other forms on your website.
Don't worry if you're new to this - this guide will show you exactly how to implement google reCAPTCHA v2 with next js and react js, step by step.
What you will learn in this guide:
- What is Google reCAPTCHA v2?
- Why Server-Side Verification is Mandatory?
- How to get free reCAPTCHA keys from Google
- How to add reCAPTCHA to your website using npm package and manual also with verification
- How to check if the user is real (not a bot)
- How to keep your website safe
No Confusing - just simple, easy-to-follow steps! Let's start!
What is Google reCAPTCHA v2 and Why is it a Game-Changer?
Google reCAPTCHA v2 is a security tool designed to assist websites in blocking automated bots from filling out forms. It shows the familiar “I’m not a robot” checkbox, and sometimes a minor challenge.
Upon the completion of the challenge by a user, Google provides a token → and it is necessary for your backend to authenticate that token with your secret key
The Golden Rule: Why Server-Side Verification is Mandatory?
Most of the developer who are at the beginner level just add the Google Recaptcha v2 widget on the client side and think that the form is secured.
Problem: A hacker can easily bypass your frontend completely and submit the form via API with a fake token.
Solution: Always verify the token on the backend using a secret key that should always remain private.
Step 1 - How to get free reCAPTCHA keys from Google? (It's Easy!)
Google provides reCAPTCHA completely free for websites.
1. Go to Google reCAPTCHA Admin Page
- To start, go to the official Google reCAPTCHA website: https://www.google.com/recaptcha/admin ( You must log in with a Google account. )
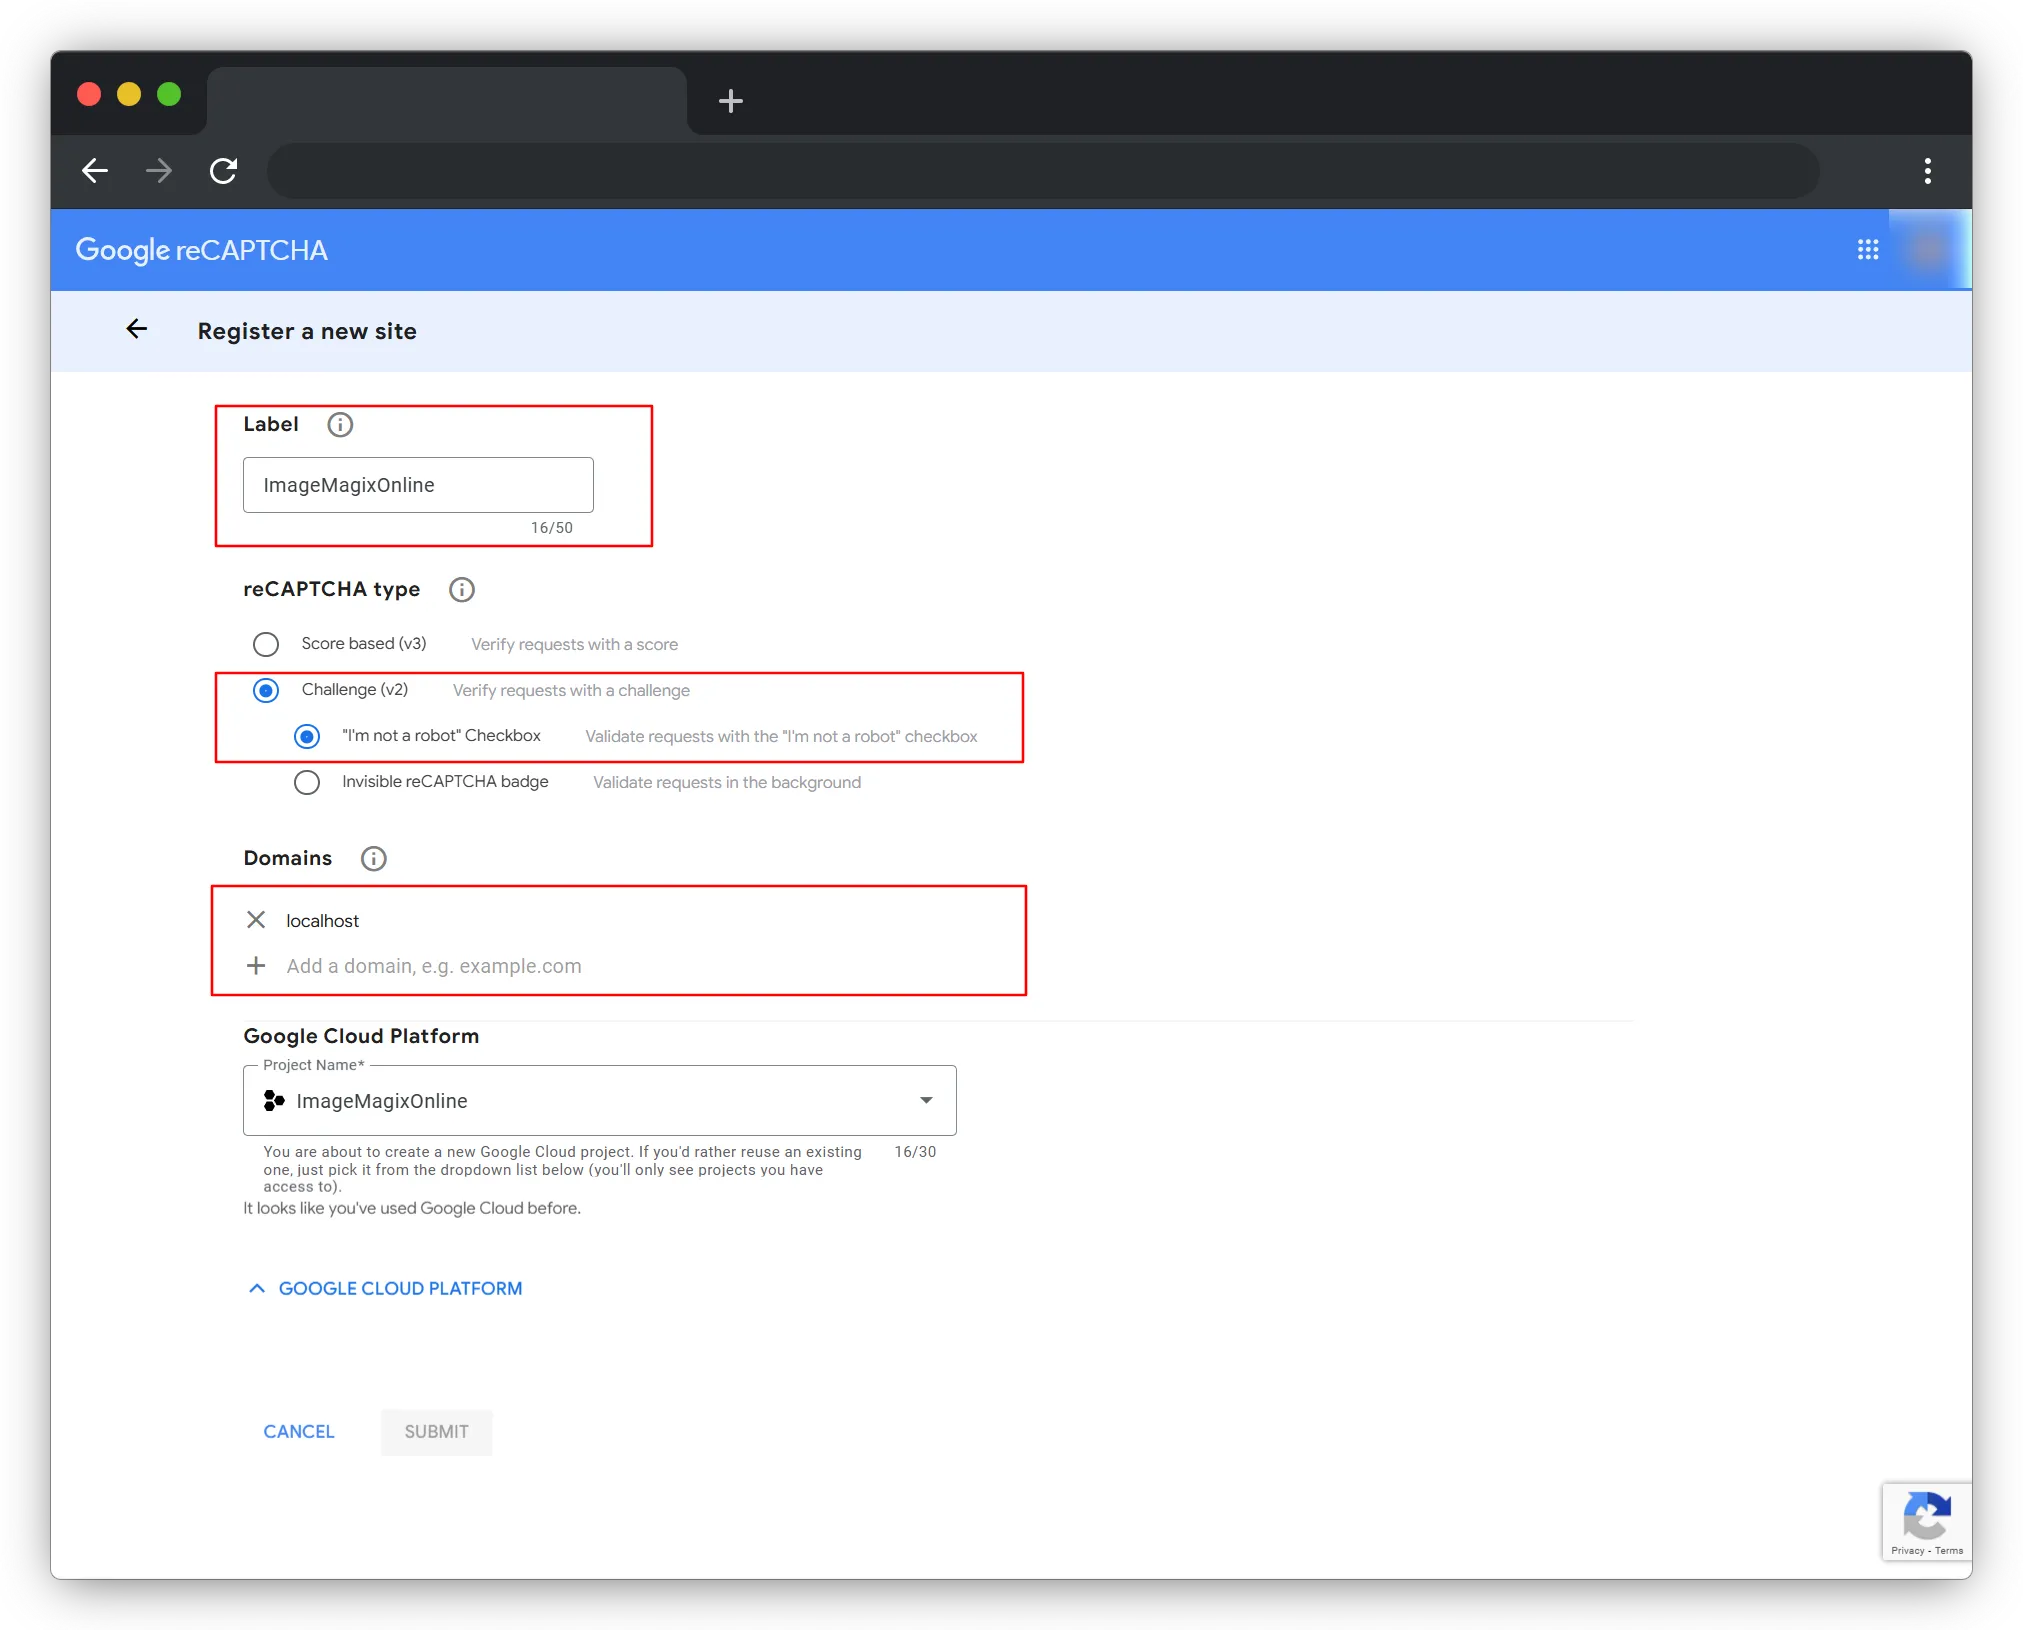
2. Register Your Website
- Label : Any name you want.
- reCAPTCHA Type : reCAPTCHA v2 → “I’m not a robot” Checkbox
- Domains : Add your domain. for example - ( localhost, yourwebsite.com, www.yourwebsite.com
Your Google email is automatically added. You can add more if needed. Click on Submit.
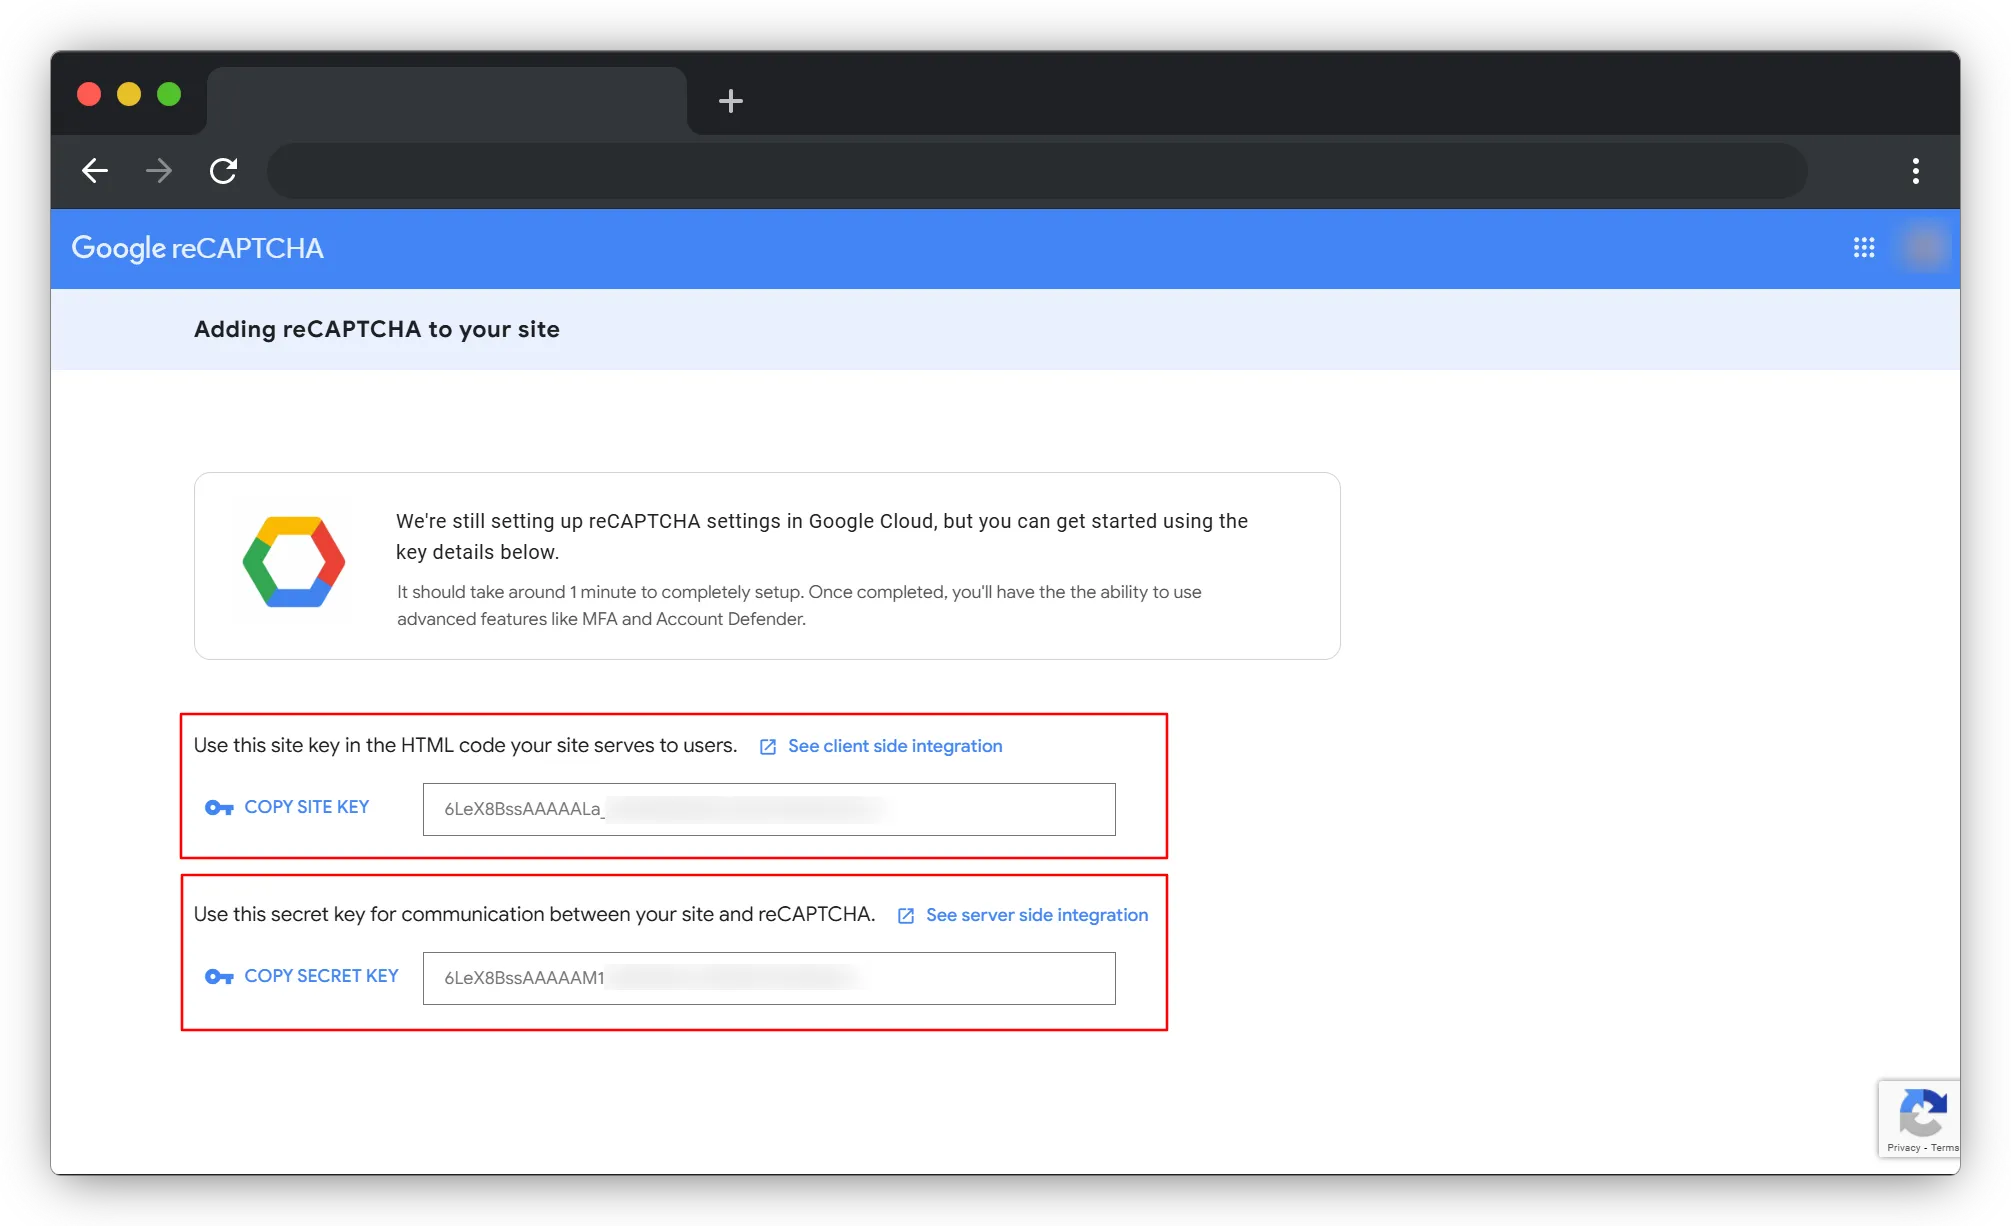
3. Google will give you two keys:
-
Site Key → This is your public key. It's safe to use on the frontend
-
Secret Key → This is your private key! Never, ever expose this in your frontend code. It's for your backend only.
4. Add them to your
.env file: In the root of your Next.js project, create or update your .env.local file with these keysNEXT_PUBLIC_RECAPTCHA_V2_SITE_KEY=your_site_key_here
RECAPTCHA_V2_SECRET_KEY=your_secret_key_here
This allows your Next.js app to use reCAPTCHA safely.
Step 2: Install reCAPTCHA : NPM Package Method (The Quick & Easy Way)
First, we will install and use the
**react-google-recaptcha** package to add reCAPTCHA to our form. Later, we will also see the manual approach. You can use any method you prefer.Installation:
bashnpm install react-google-recaptcha
Make sure you have added your environment variables inside .env.local or .env in the root directory.
Step 3: Add reCAPTCHA v2 to Your Next.js Form (Client Side)
Wherever your form component is, simply import the ReCAPTCHA component and pass your site key.
You can also use a ref to access the reCAPTCHA value later.
tsx"use client";

import { useRef, useState } from "react";
import ReCAPTCHA from "react-google-recaptcha";

const Page = () => {
  const [isToken, setIsToken] = useState(null);
  const [formData, setFormData] = useState({ text: "", email: "" });

  // Reference to the reCAPTCHA component so we can access its value later
  const recaptchaRef = useRef();

  // Triggered when reCAPTCHA challenge is solved (user clicks "I am not a robot")
  const onChange = (token) => {
    setIsToken(token); // Save verified token
  };

  const handleSubmit = async (e) => {
    e.preventDefault(); // Prevent page refresh

    // Get reCAPTCHA token from the component
    const token = recaptchaRef.current.getValue();

    // Send token to backend for verification with Google
    const res = await fetch("/api/v2captcha", {
      method: "POST",
      headers: { "Content-Type": "application/json" },
      body: JSON.stringify({ token }),
    });

    // Read response from your backend
    const data = await res.json();
    console.log("Verification Response:", data);
  };

  return (
    <section className="w-full h-dvh flex items-center justify-center bg-gray-100">
      <form
        onSubmit={handleSubmit}
        className="w-full max-w-md bg-white p-8 rounded-2xl shadow-xl flex flex-col space-y-5"
      >
        <h2 className="text-2xl font-semibold text-gray-800 text-center">
          Contact Form
        </h2>

        <input
          type="text"
          placeholder="Your Name"
          value={formData.text}
          onChange={(e) =>
            setFormData((prev) => ({ ...prev, text: e.target.value }))
          }
          className="border p-3 w-full rounded-lg"
        />

        <input
          type="email"
          placeholder="Your Email"
          value={formData.email}
          onChange={(e) =>
            setFormData((prev) => ({ ...prev, email: e.target.value }))
          }
          className="border p-3 w-full rounded-lg"
        />

        {/* RECAPTCHA BOX */}
        <ReCAPTCHA
          ref={recaptchaRef}
          sitekey={process.env.NEXT_PUBLIC_RECAPTCHA_V2_SITE_KEY}
          onChange={onChange}
        />

        {/* Submit button disabled UNTIL user completes reCAPTCHA */}
        <button
          disabled={!isToken}
          className="px-4 py-3 bg-blue-600 disabled:bg-gray-400 text-white rounded-lg"
        >
          Submit
        </button>
      </form>
    </section>
  );
};

export default Page;
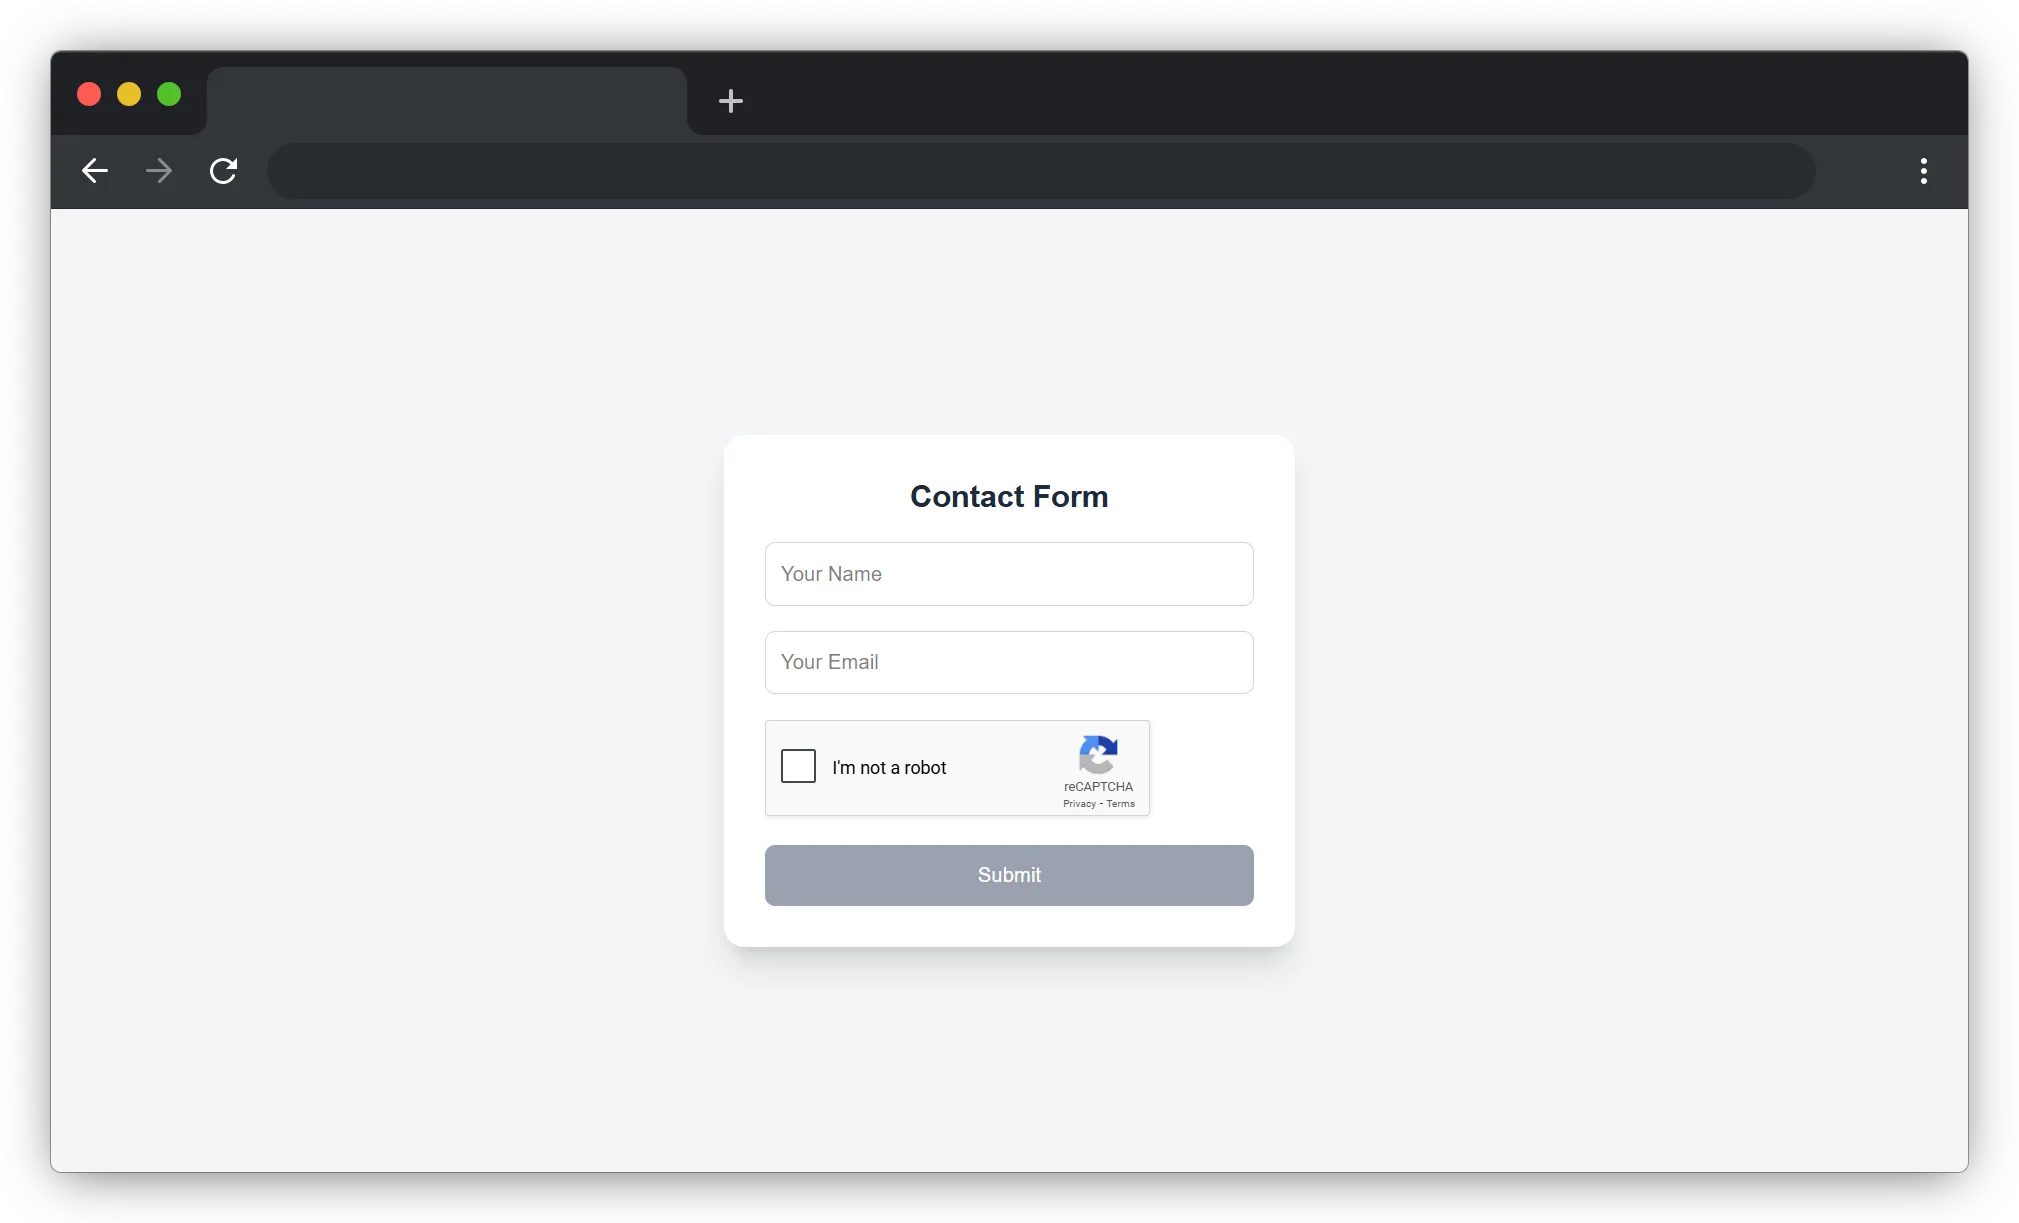
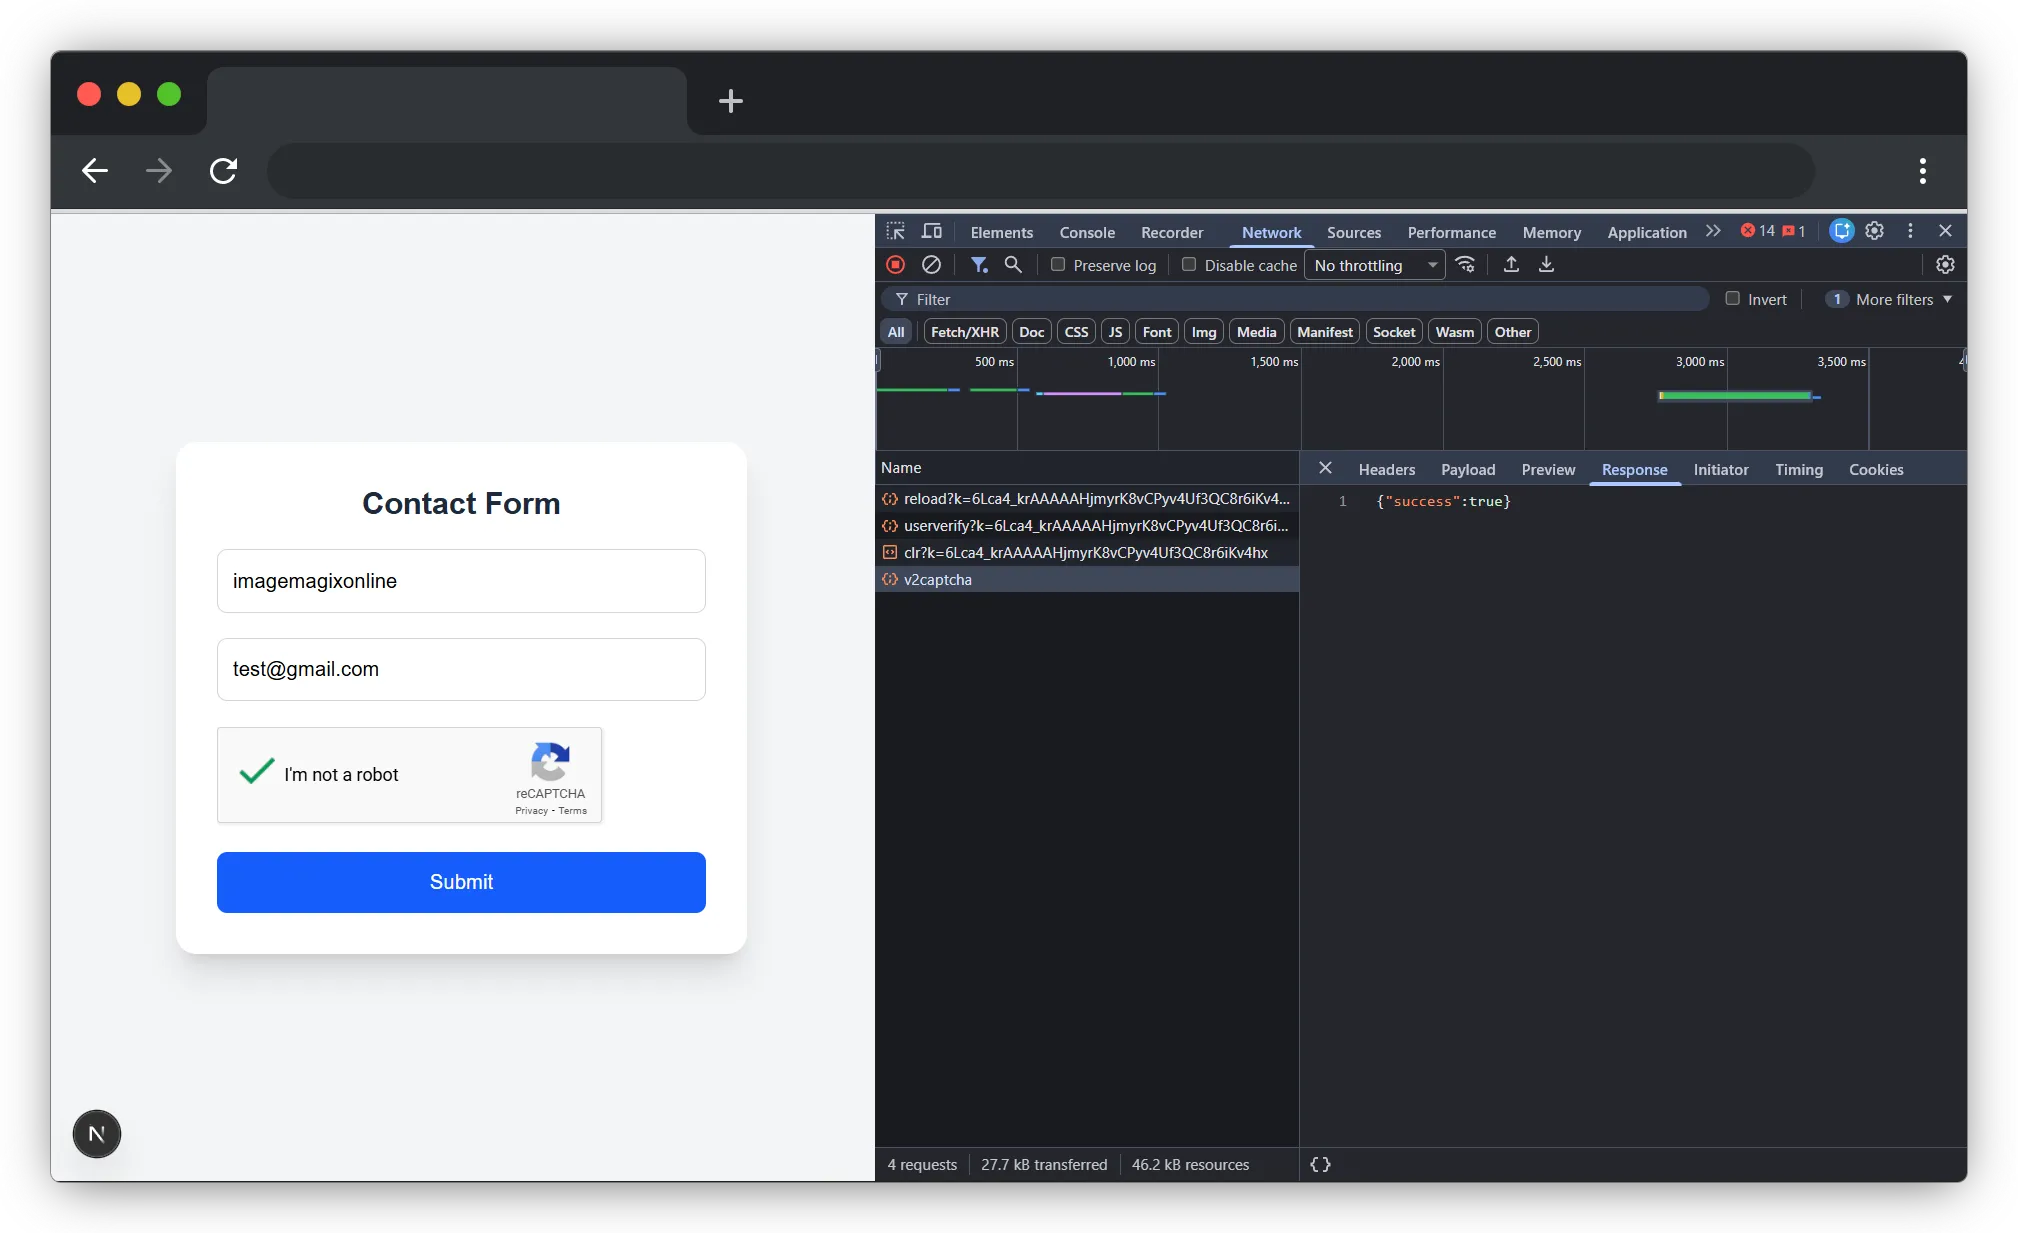
What happens when a user visits the page?
User opens the page
- The **reCAPTCHA** script loads in the browser.
- The “I am not a robot” checkbox appears.
User clicks on the checkbox
- **reCAPTCHA** checks: user behavior, IP address, browser activity.
- If Google finds anything suspicious, it will show a small puzzle.
- After the user solves it → Google creates a secret token.
When the user submits the form
- The frontend sends this token to your backend:
```javascript
fetch("/api/v2captcha", {
  body: JSON.stringify({ token }),
});
```
- The backend will then verify this token with Google to confirm that the user is real.
Step 4 : Backend API for reCAPTCHA Verification (route.ts)
Google returns a token after the user successfully completes the reCAPTCHA challenge on the frontend. But this token alone is NOT enough. It can still be faked by bots. That’s why you have to send this token to your server and use your SECRET KEY to directly verify it with Google.
In Next.js App Router, every backend API lives inside the
app/api directory. So we’ll create a fresh file where our server will:- Get the token from the client and send it to Google along with the secret key.
typescripthttps://www.google.com/recaptcha/api/siteverify```

- Google returns whether the token is valid or not
- Your backend responds to your frontend with success or failure

This guarantees that your form can only be submitted by real human users.

**Create the API Route:**

- Create a file: **app/api/v2captcha/route.ts** ( This file handles the reCAPTCHA verification logic on your backend. )

```typescript
import { NextResponse } from "next/server";

export async function POST(req: Request) {
  try {
    const { token } = await req.json();

    // Verify required environment variable exists
    const secret = process.env.RECAPTCHA_V2_SECRET_KEY;
    if (!secret) {
      return NextResponse.json(
        { success: false, error: "Missing RECAPTCHA_V2_SECRET_KEY" },
        { status: 500 }
      );
    }

    const verifyURL = "https://www.google.com/recaptcha/api/siteverify";

    // Send request to Google reCAPTCHA verification API
    const googleRes = await fetch(verifyURL, {
      method: "POST",
      headers: { "Content-Type": "application/x-www-form-urlencoded" },
      body: new URLSearchParams({
        secret,
        response: token,
      }).toString(), // cleaner & URL-safe
    });

    // Attempt to parse Google's response
    const data = await googleRes.json().catch(() => null);

    // Handle unexpected API response format
    if (!data) {
      return NextResponse.json(
        { success: false, error: "Invalid response from Google reCAPTCHA API" },
        { status: 502 }
      );
    }

    // Successful verification
    if (data.success) {
      return NextResponse.json({ success: true });
    }

    return NextResponse.json(
      { success: false, error: data },
      { status: 400 }
    );

  } catch (error) {
    return NextResponse.json(
      { success: false, error: String(error) },
      { status: 500 }
    );
  }
}
In a nutshell, Using the react-google-recaptcha package is the quickest and easiest way to protect your forms. It handles all the hard work for you loading Google’s script and managing tokens so you only need to add a simple
This approach is perfect for most projects where development speed and a proven solution are top priorities.
But what if you want the same protection without making users click a checkbox? For that, we can turn to the invisible version of reCAPTCHA.
Manual Implementation Without NPM Package (The Lightweight Approach)
While the react-google-recaptcha package is convenient, some developers prefer a manual setup for better control or to reduce dependencies. The manual method loads Google's reCAPTCHA script directly and gives you complete control over the implementation.
Why choose the manual method?
- Zero dependencies - No extra packages to install
- Smaller bundle size - Your app stays lightweight
- Full control - You manage exactly how and when reCAPTCHA loads
- Better understanding - You learn how reCAPTCHA actually works under the hood
Let's implement the same functionality manually!
Step 1: Loading the reCAPTCHA Script
Instead of importing a package, we'll load Google's script directly into our page using the **useEffect **hook. This ensures the script loads only when the component mounts.
Create your form component: app/contact/page.js
typescript"use client";
import { useEffect, useRef, useState } from "react";

const Page = () => {
  const [isToken, setIsToken] = useState(null);
  const [formData, setFormData] = useState({ text: "", email: "" });
  const [captchaReady, setCaptchaReady] = useState(false);
  const recaptchaRef = useRef(null);

  useEffect(() => {
    // Create the callback before loading script
    window.onloadCallback = () => {
      // Ensure container exists
      if (!recaptchaRef.current) return;

      // Render captcha widget
      window.grecaptcha.render(recaptchaRef.current, {
        sitekey: process.env.NEXT_PUBLIC_RECAPTCHA_V2_SITE_KEY,
        callback: (token) => setIsToken(token),
      });

      setCaptchaReady(true);
    };

    // Load Google reCAPTCHA script
    const script = document.createElement("script");
    script.src =
      "https://www.google.com/recaptcha/api.js?render=explicit&onload=onloadCallback";
    script.async = true;
    script.defer = true;
    document.body.appendChild(script);
  }, []);

  const handleSubmit = async (e) => {
    e.preventDefault();

    if (!isToken) {
      alert("Please complete captcha");
      return;
    }

    const res = await fetch("/api/v2captcha", {
      method: "POST",
      headers: { "Content-Type": "application/json" },
      body: JSON.stringify({ token: isToken }),
    });

    const data = await res.json();

    if (data.success) {
      alert("Form submitted successfully!");
      // Reset form or redirect user
    } else {
      alert("Verification failed. Please try again.");
    }
  };

  return (
    <section className="w-full h-dvh flex items-center justify-center bg-gray-100">
      <form
        onSubmit={handleSubmit}
        className="w-full max-w-md bg-white p-8 rounded-2xl shadow-xl flex flex-col space-y-5"
      >
        <h2 className="text-2xl font-semibold text-gray-800 text-center">
          Contact Form
        </h2>

        <input
          type="text"
          placeholder="Your Name"
          value={formData.text}
          onChange={(e) =>
            setFormData((prev) => ({ ...prev, text: e.target.value }))
          }
          className="border p-3 rounded-lg"
        />

        <input
          type="email"
          placeholder="Your Email"
          value={formData.email}
          onChange={(e) =>
            setFormData((prev) => ({ ...prev, email: e.target.value }))
          }
          className="border p-3 rounded-lg"
        />

        {!captchaReady && (
          <p className="text-sm text-gray-500">Captcha loading...</p>
        )}

        {/* Container where reCAPTCHA will render */}
        <div ref={recaptchaRef} />

        <button
          type="submit"
          disabled={!isToken}
          className="px-4 py-3 bg-blue-600 disabled:bg-gray-400 text-white rounded-lg"
        >
          Submit
        </button>
      </form>
    </section>
  );
};

export default Page;
Understanding the Manual Implementation What's happening in the code?
Script Loading - We dynamically create a script tag and append it to the document body. The script URL includes two important parameters:
- render=explicit - Tells Google we'll manually control when to render the widget.
- onload=onloadCallback - Names the function Google should call when ready.
Callback Function - window.onloadCallback is triggered once Google's script finishes loading. Inside this function, we use window.grecaptcha.render() to display the checkbox.
Token Management - When a user completes the challenge, Google automatically calls our callback function with a token. We save this token in state using setIsToken().
Submit Handler - Before submitting, we check if a token exists. If yes, we send it to our backend for verification.
Step 2: Backend Verification (Same for Both Methods)
Whether you use the NPM package or manual method, the backend verification process remains identical. You already have this file from Step 4, but here it is again for reference:
File: app/api/v2captcha/route.ts
typescriptimport { NextResponse } from "next/server";

export async function POST(req: Request) {
  try {
    const { token } = await req.json();
    const recaptchaVerifyURL = "https://www.google.com/recaptcha/api/siteverify";

    const secret = process.env.RECAPTCHA_V2_SECRET_KEY;

    const response = await fetch(recaptchaVerifyURL, {
      method: "POST",
      headers: { "Content-Type": "application/x-www-form-urlencoded" },
      body: `secret=${secret}&response=${token}`,
    });

    const data = await response.json();

    if (data.success) {
      return NextResponse.json({ success: true });
    }

    return NextResponse.json({ success: false, error: data }, { status: 400 });

  } catch (error) {
    return NextResponse.json(
      { success: false, error: String(error) },
      { status: 500 }
    );
  }
}
Your backend receives the token, sends it to Google along with your secret key, and returns whether the verification succeeded.
Our Recommendation: For most projects, start with the NPM package. It's battle-tested and saves time. Switch to manual only if you need specific customization or want to minimize dependencies.
Common Issues and How to Fix Them 💡
Issue 1: reCAPTCHA Not Showing
- Solution: Check that your domain is registered in Google reCAPTCHA admin console. Remember to add both localhost for development and your production ( www.imagemagixonline.com ) domain.
Issue 2: "Invalid Site Key" Error
- Solution: Verify your .env.local file has the correct NEXT_PUBLIC_RECAPTCHA_V2_SITE_KEY. The NEXT_PUBLIC_ prefix is required for client-side access in Next.js.
Issue 3: Verification Always Fails
- Solution: Ensure your secret key in .env.local is correct and that you're using RECAPTCHA_V2_SECRET_KEY (without the NEXT_PUBLIC_ prefix) on the server side.
Security Best Practices
Never expose your secret key - Always keep it in .env.local and never commit it to Git. Add .env.local to your .gitignore file.
Always verify on the backend - Never trust the frontend alone. Bots can bypass client-side checks.
Use environment variables - This keeps your keys safe and makes it easy to use different keys for development and production.
Conclusion: Your Forms Are Now Protected!
Congratulations! 🎉 You've successfully learned how to implement Google reCAPTCHA v2 in your Next.js application using both the NPM package method and the manual approach. Your forms are now protected from spam bots and automated attacks.
What you've accomplished:
- Set up free reCAPTCHA keys from Google
- Implemented client-side reCAPTCHA (two different ways)
- Created secure server-side verification
- Protected your forms from bots and spam
Next Steps:
- Stay Updated on Security: High-profile incidents like the 2026 Vercel breach demonstrate why robust security and secret management are essential for modern web apps.
- Test your implementation thoroughly in both development and production
- Consider adding reCAPTCHA to all your public forms
- Monitor your reCAPTCHA analytics in the Google admin console
- Explore reCAPTCHA v3 for invisible, score-based protection
Remember: Bot protection is not optional. It's essential for any production website with forms. With this guide, you now have the knowledge to keep your forms secure!
Found this helpful? Share it with other developers who are building with Next.js! Have questions? Drop them in the comments below.
Happy coding!!
Frequently Asked Questions
Related Tools
Try out these tools mentioned in the article.